Taking on the Cloud Resume Challenge (with DevOps Mods)
Last year, I acquired the AWS Cloud Practitioner Certification. I did this with the help of the essentials course from AWS and Jon Bonso’s practice exams. While these resources were helpful in understanding AWS at a high level, I wanted to get my hands a bit more dirty. I wanted to actually work with AWS cloud products. This will be additional preparation for the AWS Solutions Architect certification exam I plan on taking this year. Enter the Cloud Resume Challenge.
What is the Cloud Resume Challenge?
The Cloud Resume Challenge is an initiative made by Forrest Brazeal to help anyone advance their cloud career. The challenge? Create a resume and make it available on the internet. This sounds simple enough. But the challenge requires that the website make use of a broad range of cloud resources. It also requires that best practices are applied when making the website. This includes end-to-end testing and continuous integration and deployment.
I purchased the official guidebook to help me take this challenge on the right track.
The challenge tests out fundamental knowledge of web and cloud development. Divided into 4 sections, I would have to:
-
Code and deploy a static website
-
Make a serverless API
-
Integrate front-end and back-end; and (most importantly),
-
Write and apply infrastructure-as-code.
I took on this challenge. And here’s how I did it.
Chunk 1: Frontend
The first chunk of the challenge is to create a tech resume in the form of a static website. This is then deployed on the internet.
Writing the Resume
I started off by writing the content for my resume. How to make a good resume is a whole ‘other topic (I still even have to keep modifying my own). I’m not going to get into it in this blog, but I can share that I had The Tech Resume by Gergely Orosz guide me with writing mine. It’s a good read so check it out if you’re interested.
I converted my written resume into JSON to consume and render it for my website.
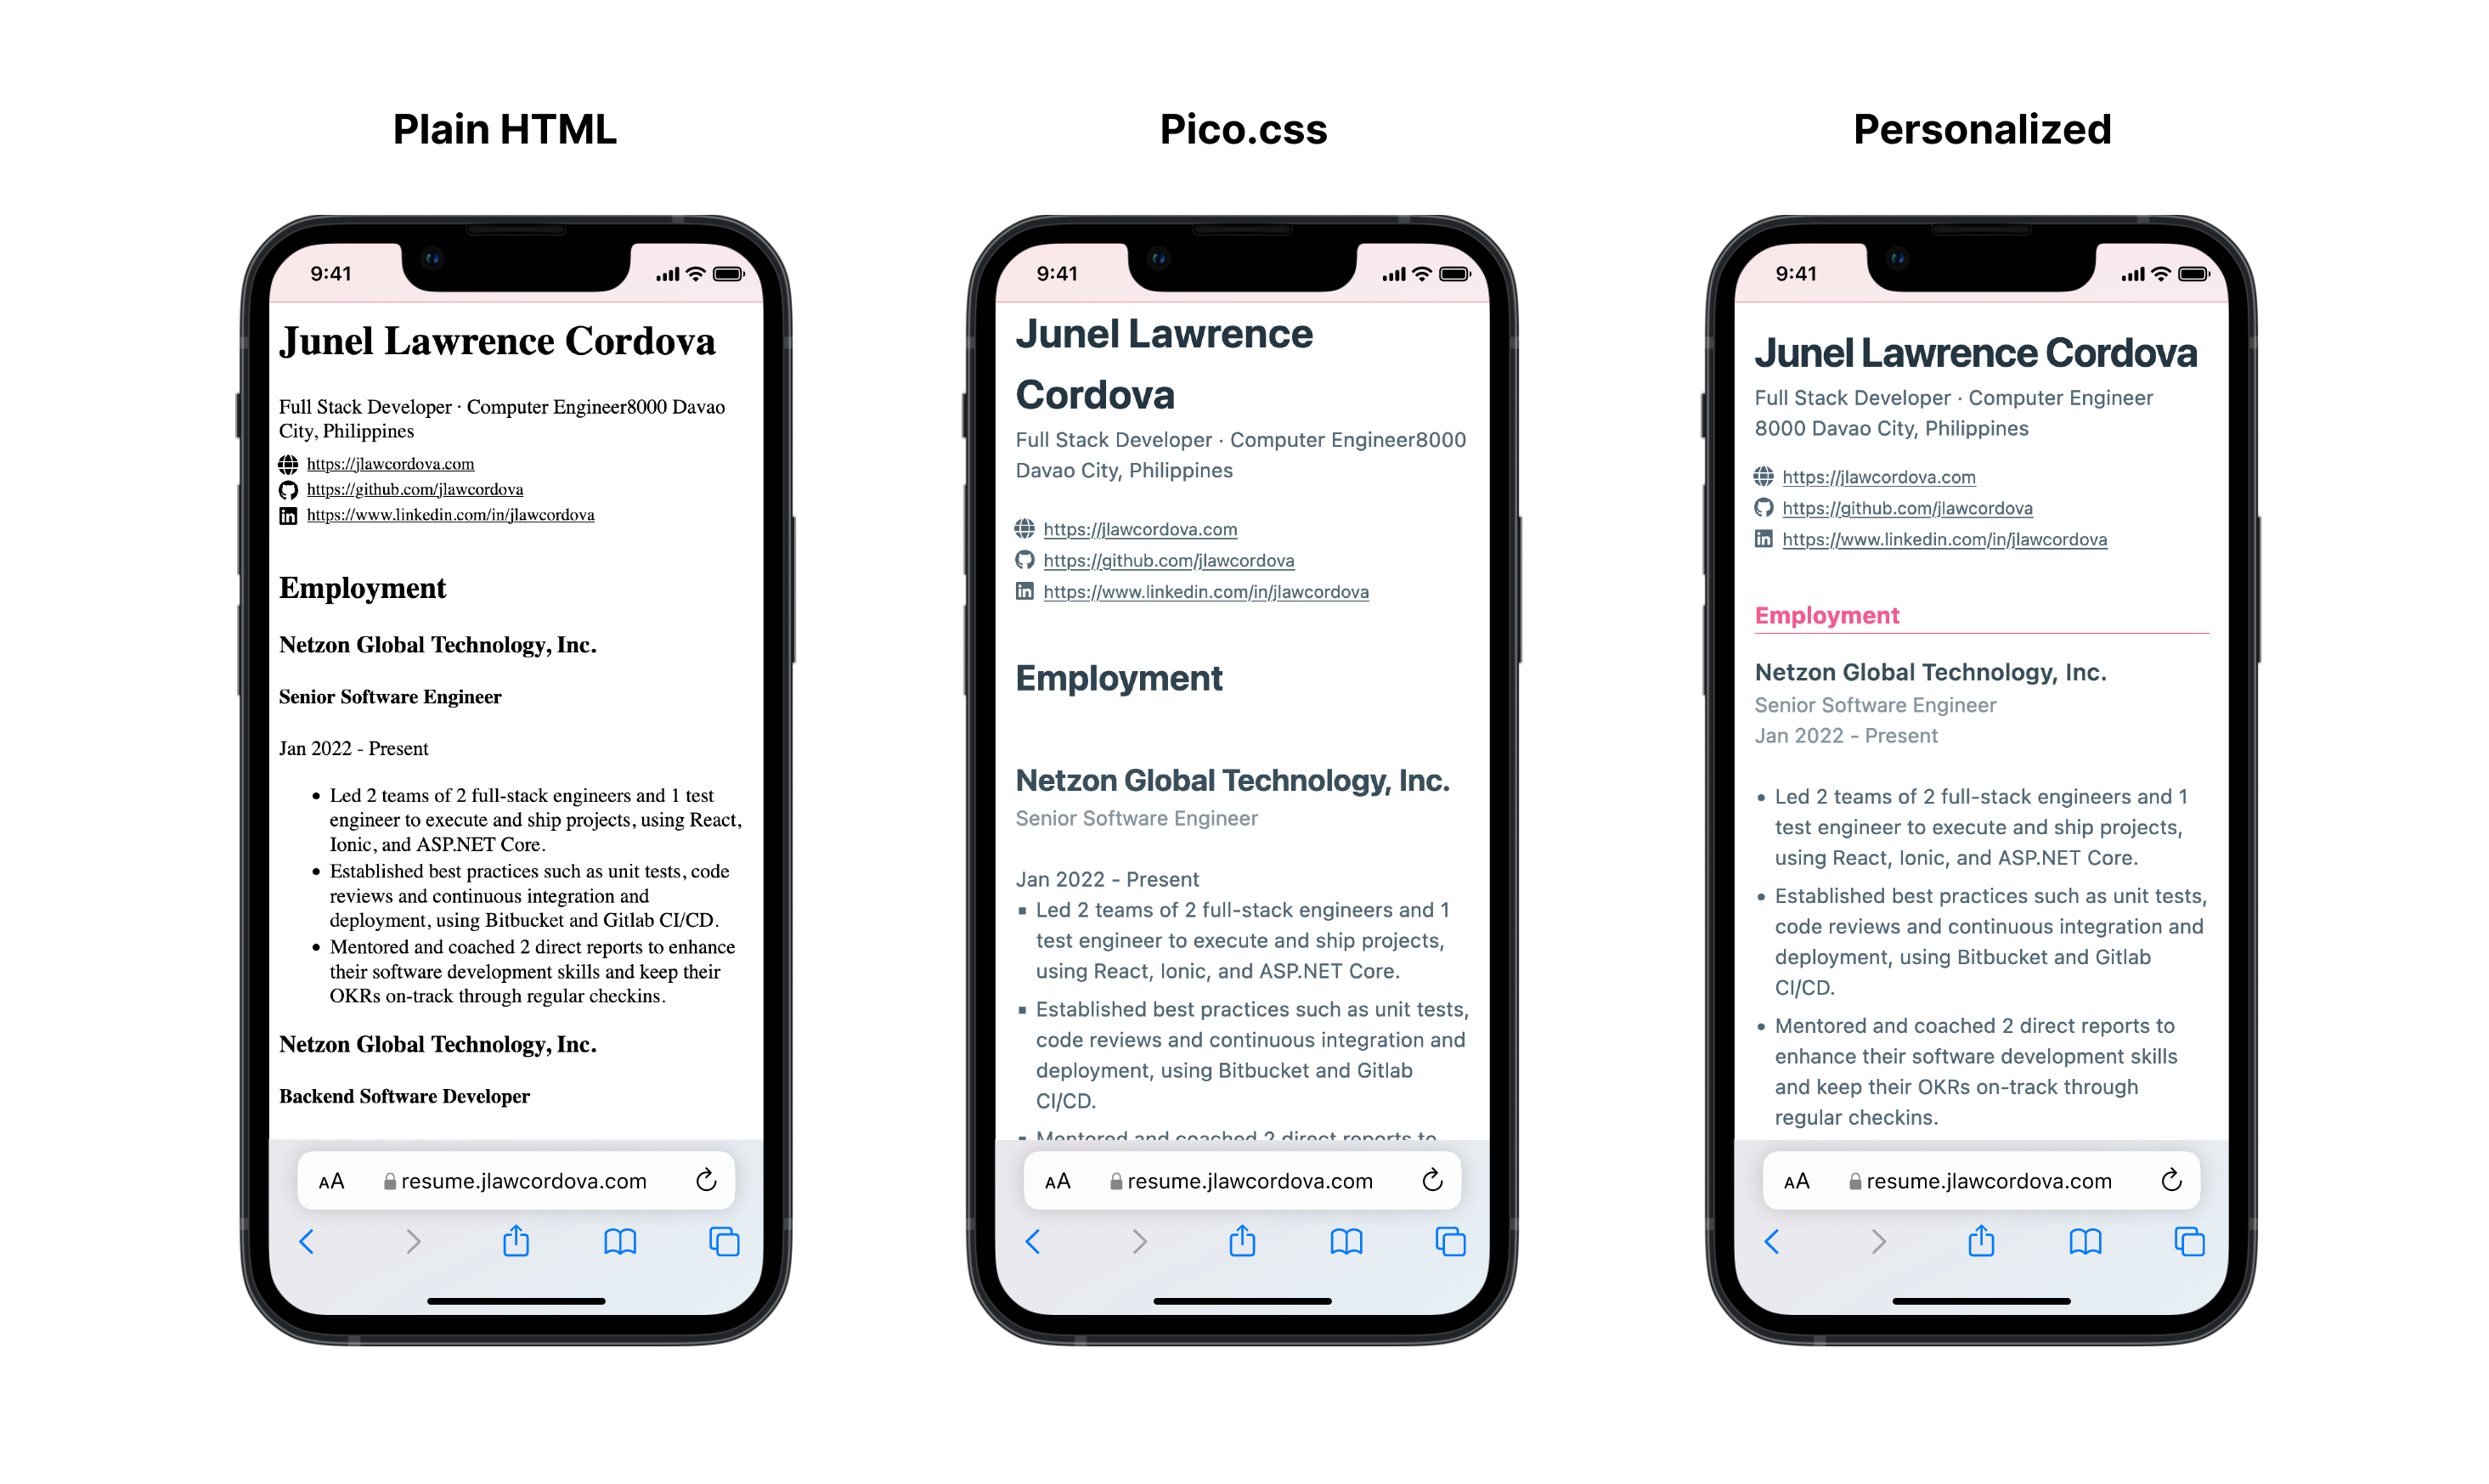
Content and Layout with HTML and React
Once I had the resume content ready, I began coding the website. Originally, the challenge made use of plain HTML and CSS. I ended up using React so that I could break down parts of my resume into reusable components. I also did an audit of Meta’s React Basics course a while back. I wanted to apply what I learned in that course in this challenge as well.
I used Create React App to initialize the project. I then made React components for each of the resume sections. I applied this to all other sections, and eventually, I had a structured website.
Styling with CSS
To style the website, I made use of minimal CSS. I used Pico.css for its use of semantic HTML and out-of-the-box screen responsiveness. I did want to make the design more personalized though. For this, I used the cascading concept in CSS to apply my own CSS styles on top of Pico.css.
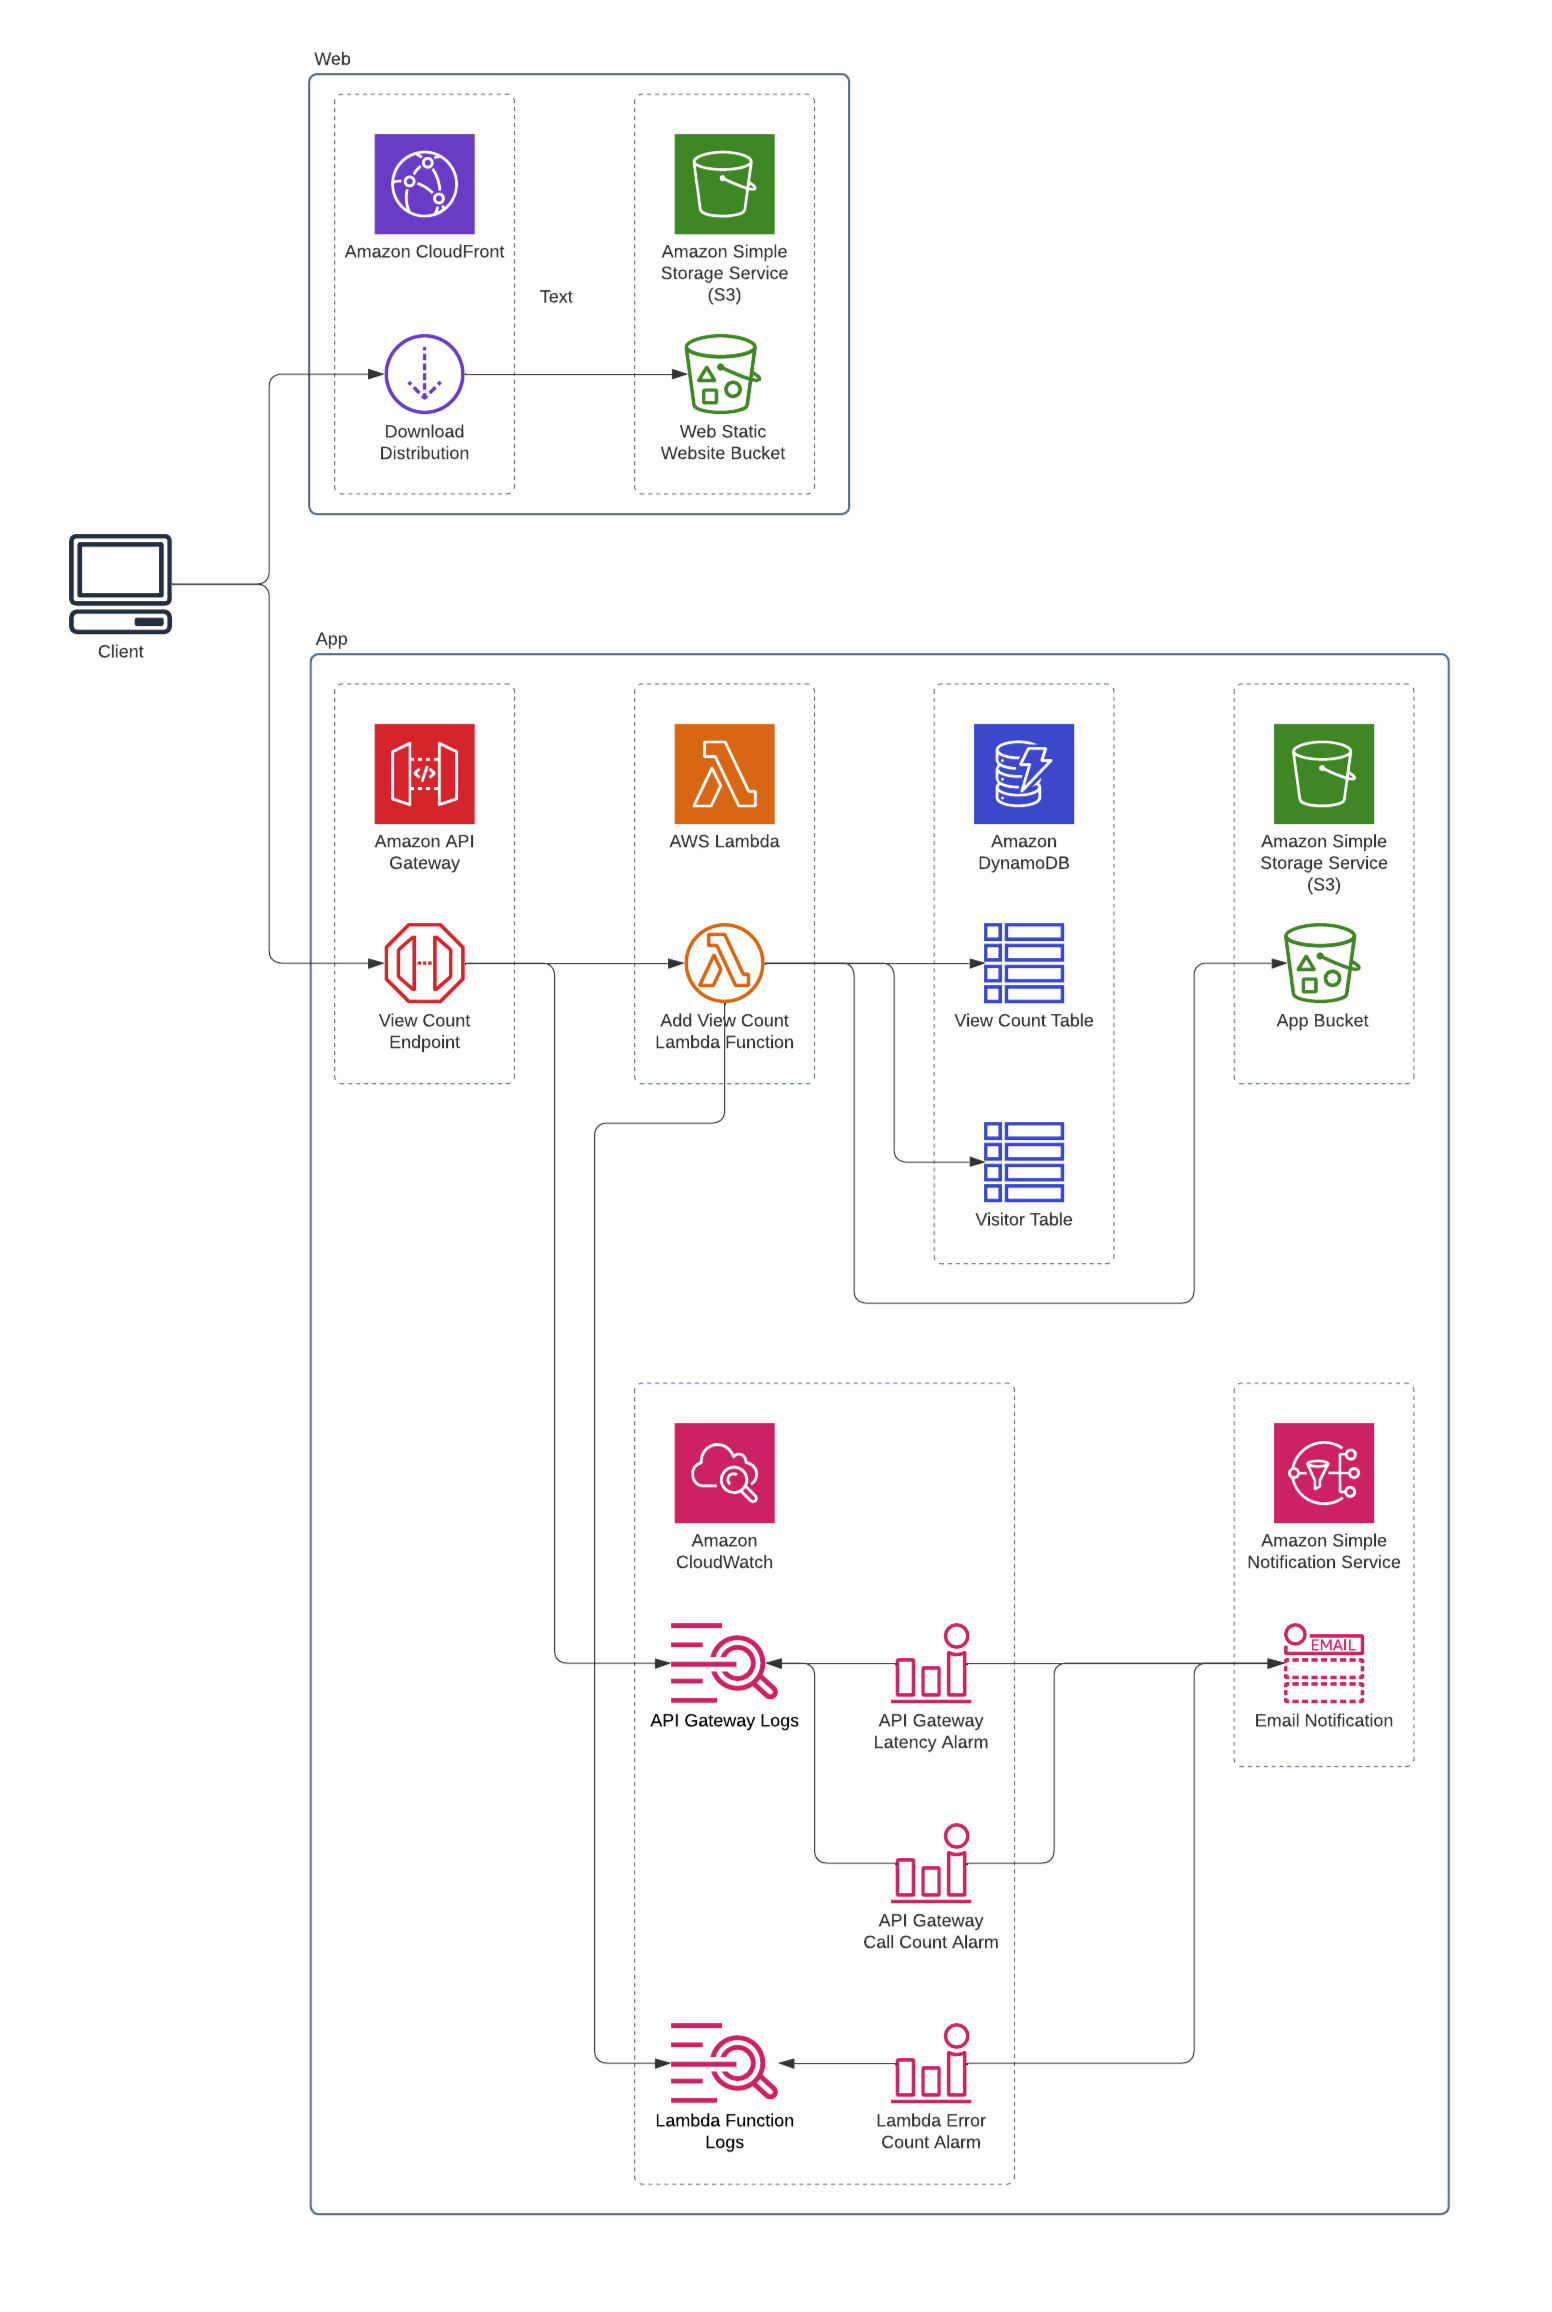
S3 Website Hosting and CloudFront Global Distribution
I now need to serve this website publicly for everyone to see. I generated a static production build for my Create React App which I uploaded and served in AWS S3. This is then globally distributed with a CloudFront distribution and the S3 bucket as its origin.
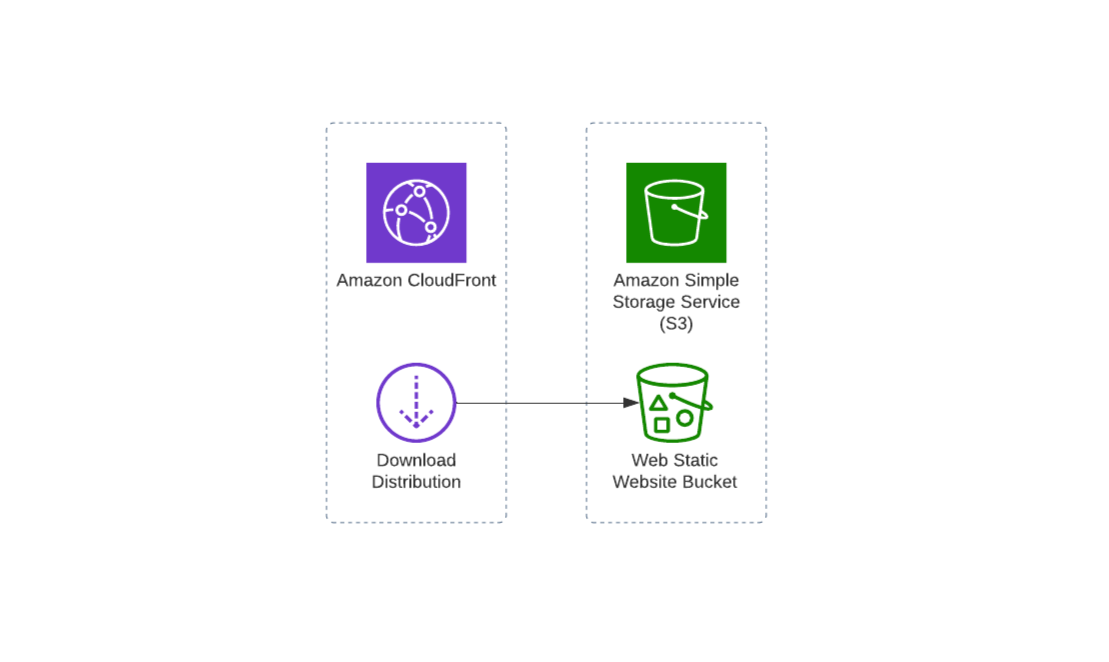
Lastly, I purchased a domain in Google Domains. I set it as an alternate domain for my CloudFront Distribution. I also had to cover this with a valid SSL certificate issued from ACM. And with that, my resume became available at resume.jlawcordova.com
Chunk 2: API
With the resume deployed publicly, we want to have a way to keep track of the number of views the website gets. To do this, we have to create an API that does this tracking (Chunk 2), and then make a call to that API from my website (Chunk 3).
DynamoDB and Lambda
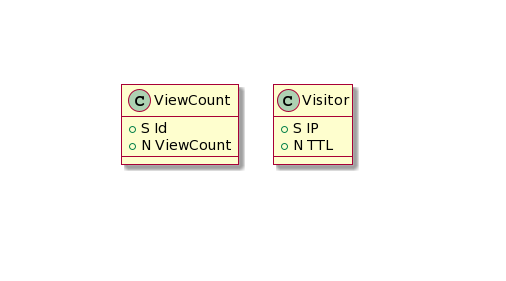
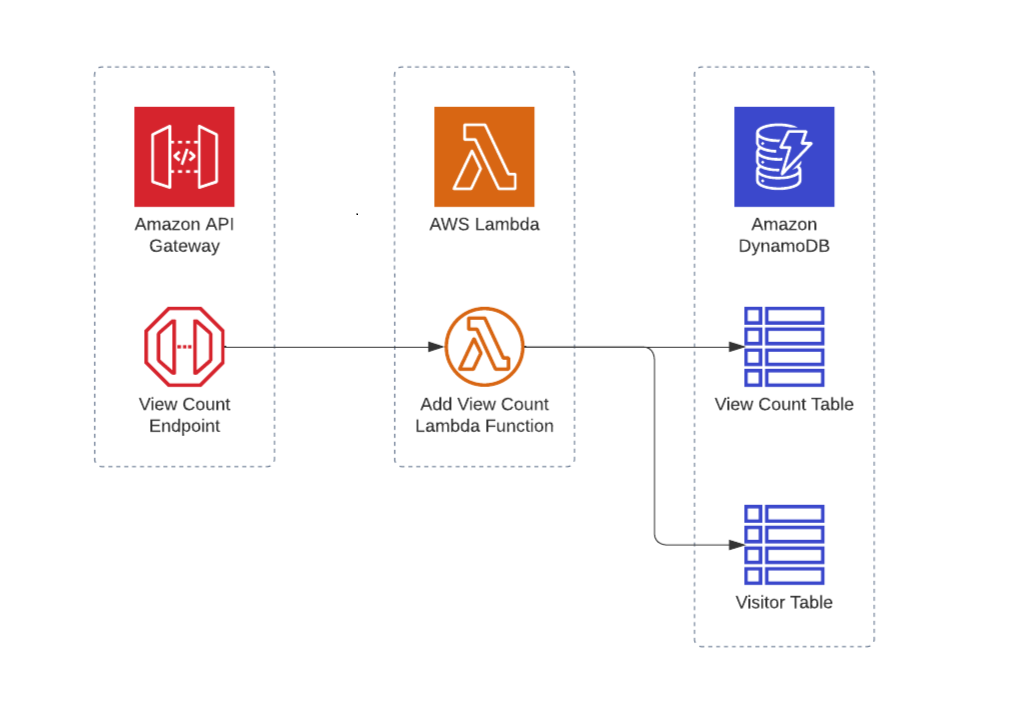
For Chunk 2, I started by setting up a DynamoDB table called View Count. I’m using this as a persistent NoSQL storage to save the number of views. The table only has one item which contains the Resume ID and ViewCount attributes.
Next, I made a NodeJS Lambda function to handle application logic. Each time the Lambda function is called, it increments the number of views by 1 in the DynamoDB table. The lambda function does this by using the DynamoDBClient available in the AWS SDK. I gave the Lambda function an IAM role with the necessary DynamoDB permissions.
HTTP API with API Gateway
Websites typically use HTTPS to make API calls and handle resources - in this case, our view count. This means that our website can’t call the Lambda function directly. I had to make an endpoint in API Gateway. I configured the gateway to use PATCH /view-count as its route and added the lambda function as its integration.
Handling Unique Visitors
Right now, calling the PATCH /view-count endpoint increments the view count every time, regardless of who made the call. Instead, I wanted it so that the view count only increments if a new person made the API call or if the call was made at a different day.
For this, I made another DynamoDB table called Visitor. This new table keeps track of the information of each viewer (their hashed IP address) that has made an API call. The lambda functions first checks if a viewer has an entry on the Visitor table and only increments the view count if they don’t. The table also has a one-day-TTL to remove the viewer entry daily. This results in the view count still incrementing when called on different days.
Chunk 3: Integration
Integration with React Hooks and Axios
I now have to make a call to the PATCH /view-count endpoint from my website. I installed the Axios library in my React project and used it to make an HTTPS call within a useEffect hook. For the HTTPS call to work, I added a CORS configuration in my API Gateway. This allows API calls from the origins where my resume website resides. I also made sure to handle errors that might occur on my website when the call to PATCH /view-count fails.
End-to-End Testing with Cypress
With the website functioning, I have to do some automated tests. This makes it faster to test out the project. This reduces the chance of introducing bugs when making code changes. I used Cypress to perform end-to-end testing. I made 3 test cases to see if my API returns responses successfully and if my website is able to render the important parts of my resume.
Chunk 4: Automation
The 4th chunk in the challenge calls for the website to be production ready. The status of the website should be constantly monitored. The website also needs to be easily deployed.
Logging and Monitoring with CloudWatch
I have to be alerted when the website fails or degrades for some reason. For this, I set the API Gateway endpoint and the Lambda function to save their logs on CloudWatch. Next, I set up CloudWatch alarms which trigger when anomalies are detected on the logs. These include scenarios where the API Gateway would take longer than usual to respond or the Lambda function would throw errors. SNS sends an email notification to my inbox when these alarms trigger.
Infrastructure-as-Code with Terraform
Here comes the part which took the most significant amount of time to complete. The entire project I’ve made so far needs to be automatically deployed. I took a step back and looked at the overall Cloud Resume Challenge architecture.
This architecture had to be specified in a declarative manner. This is a concept known as Infrastructure-as-Code (IaC). I wouldn’t have to manually go through the AWS Management Console and make each cloud resource. Instead, I could provision resources through code. This would allow me to build and modify the entire infrastructure in a safe and repeatable way.
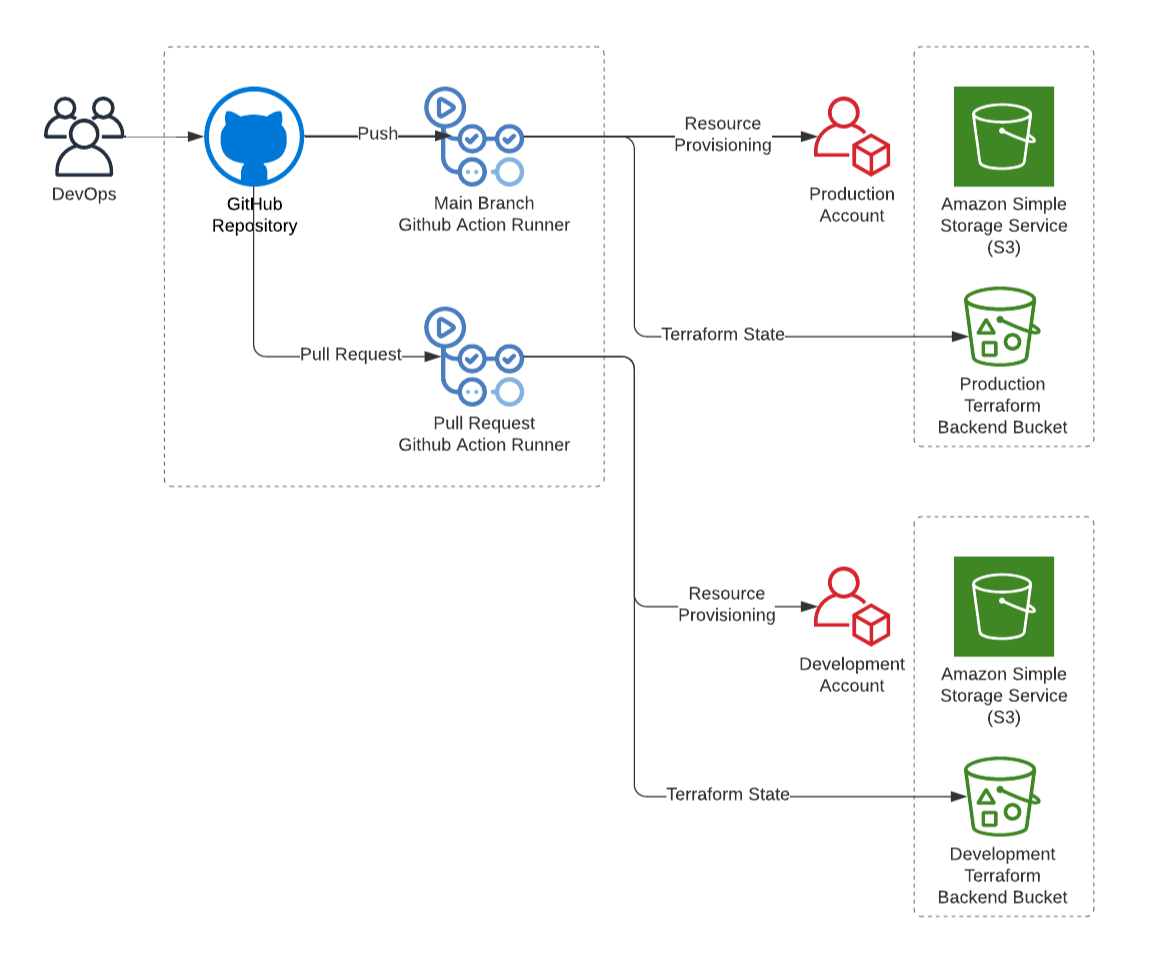
I wrote Terraform configurations to specify the architecture I have. I divided the IaC into two modules - web (frontend) and app (backend). First I apply the app module to deploy the backend. I get the URL for the API Gateway as a Terraform output and use this to configure the build of the React app. With the React app build ready, I apply the web module which deploys this React app into AWS.
CI/CD with Github Actions
I have made the entire Cloud Resume Challenge source code available on Github for it to be open-source and version controlled. I used Github Actions for continuous integration and deployment (CI/CD). Pushing changes to the main branch applies Terraform configurations to my production environment. I set up a Terraform backend using S3 to maintain the state of the production environment across commits.
I took this a step further with the DevOps mods challenge extension. I made use of Terraform variables to reuse Terraform modules in different Github environments. I also made another Github workflow. Making a pull request to my Github repository would deploy a new fresh instance of the Cloud Resume Challenge. This instance would be in a development AWS account separate from production. The Cypress tests run every after deployment. This ensures that the project runs as expected before merging with the main branch and deploying to production. The instance is destroyed once approved and merged with main.
There’s a Final Chunk: Blog
The last part of the challenge is to write this blog. Making the whole website from front-end to back-end is one thing. Writing about it and sharing it with the world is another. And with you reading this blog to completion, I have in turn also completed this challenge.
I just want to say that this challenge was a pretty fun experience. I had some instances where I was scratching my head for hours trying to fix bugs that occur. Still, the head-scratching was worth it. The end result was pretty satisfying - and I’d do it all over again. I’m now excited and more confident to make more projects in the cloud. Wish me luck on the AWS Solutions Architect certification exam!
The full source code for this challenge is available on my Github account.
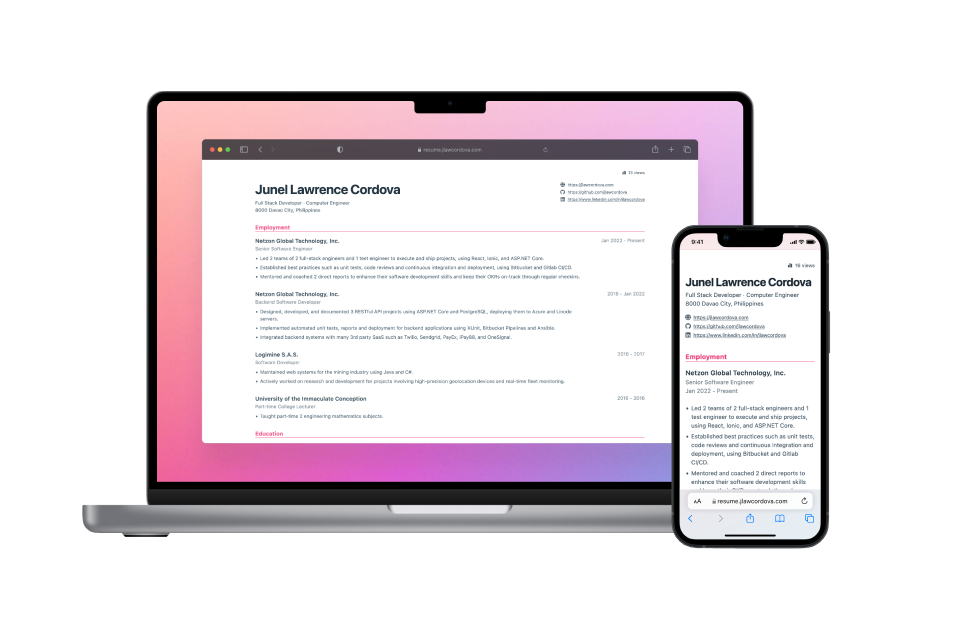
Check out the resume at resume.jlawcordova.com.