Creating a GraphQL Endpoint in NestJS
ReSTful APIs are a known standard when it comes to retrieving server-side information or resources. This architecture works well for distributed systems since it exposes each server resource in its own URI, allowing for mechanisms such as self-documentation and hypermedia. But while ReSTful APIs present useful capabilities for distributed systems, it does have its downsides when it comes to working with UIs.
Stitching up a UI
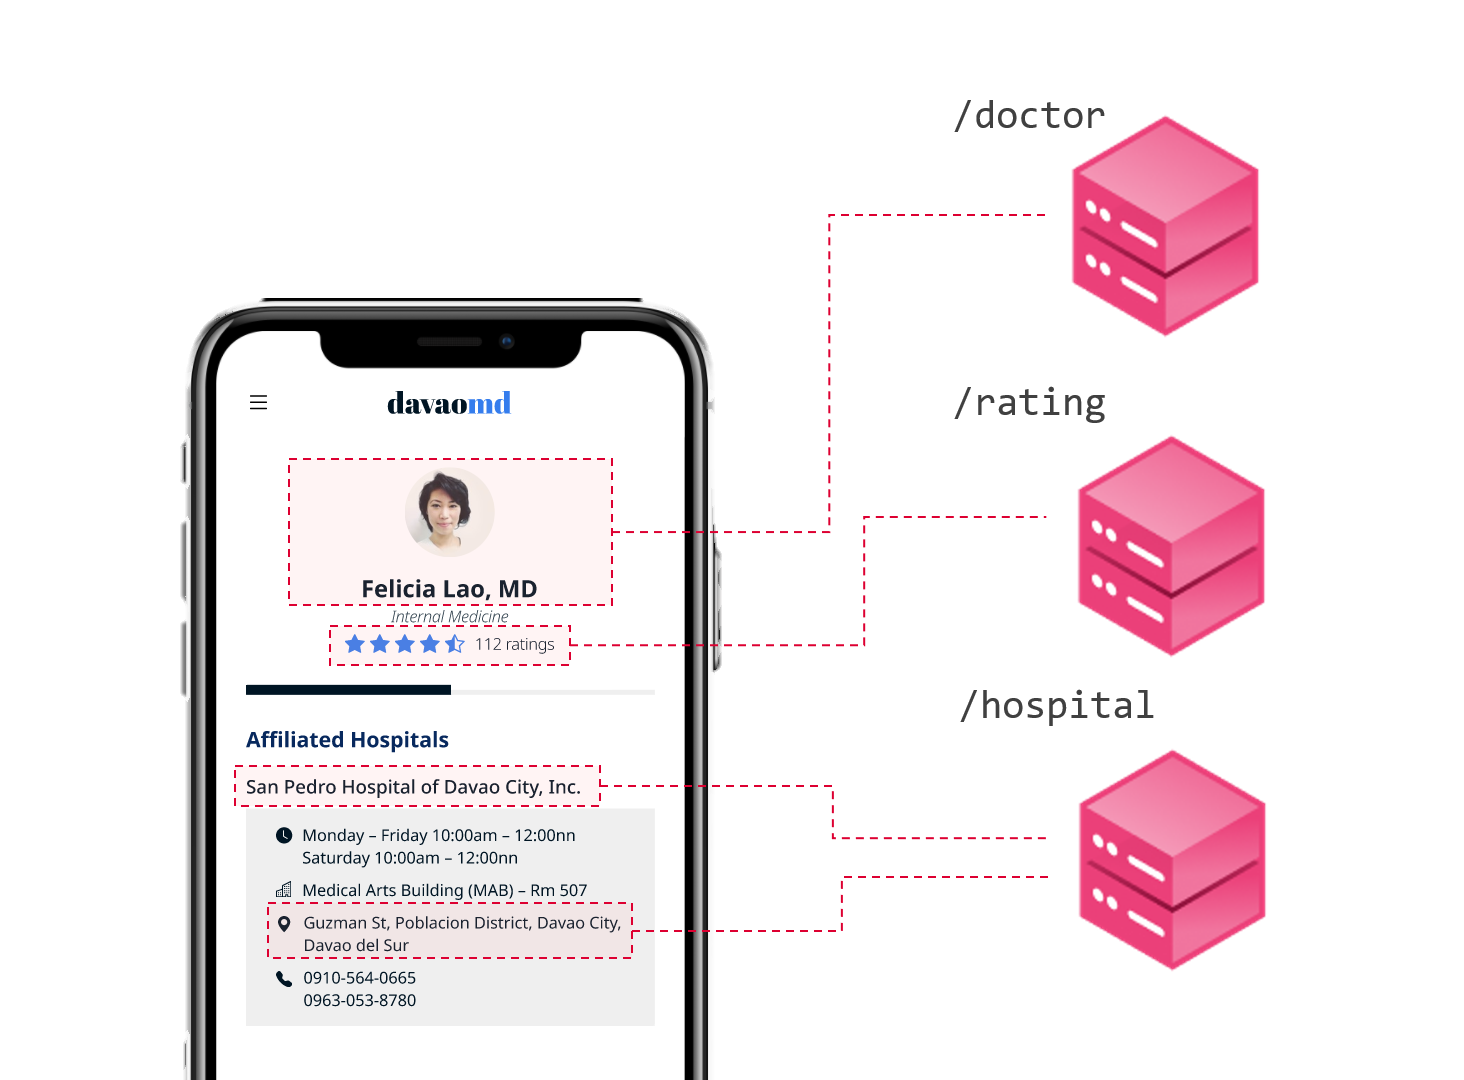
A UI can have many parts that would each correspond to a different resource. The client app would have to make calls to multiple ReST HTTP URIs to stitch up the complete UI page. Moreover, some fields in the HTTP response might not be used at all by the UI. This can be observed in the scenario shown below.

Scenarios like these can lead to chatty network calls and unnecessary bandwidth use.
API Gateway
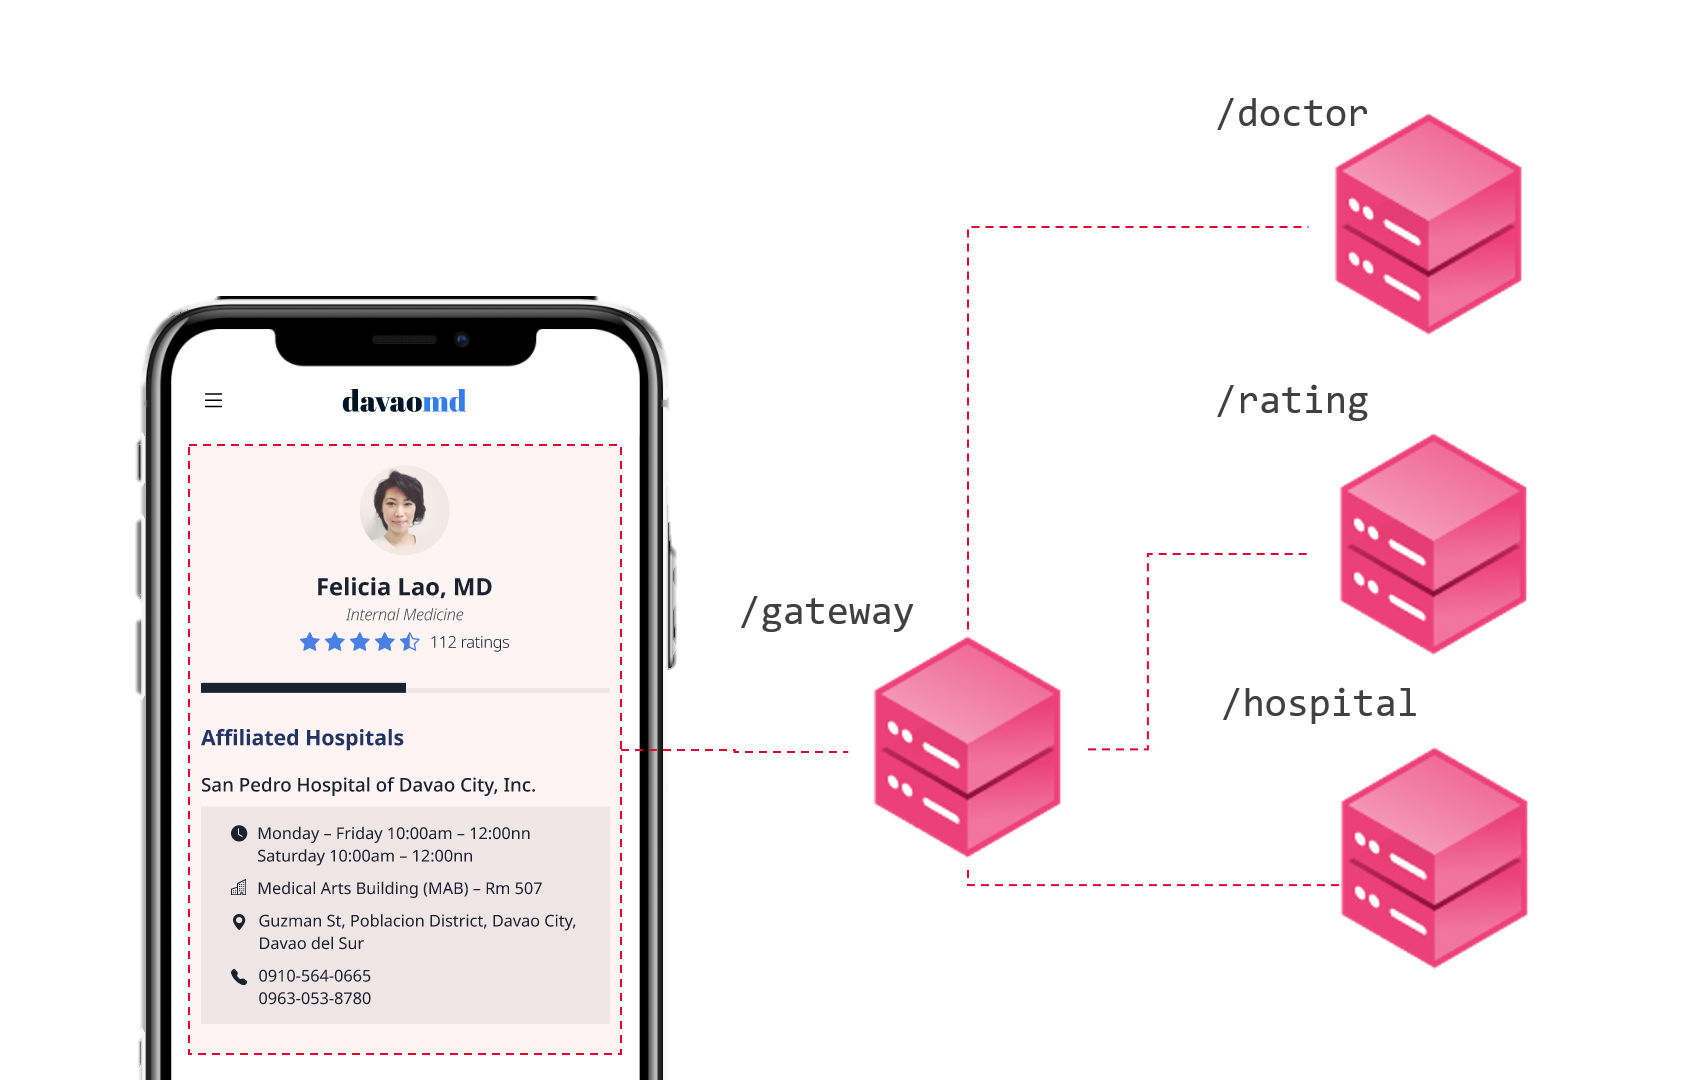
One solution to avoid chatty network calls is to make use of server-side aggregation. Instead of accessing multiple resources through separate API calls, UIs can use an API gateway which does the aggregation of the resources.

We can take this one step further by introducing GraphQL.
Introducing GraphQL
GraphQL can be used like an API gateway which aggregates information from multiple API endpoints. Not only that, but it also enables the client UI to request only specific resources that it needs. GraphQL focuses more on its query language which adheres to schemas rather than strictly adhering to the ReST principles. A GraphQL query looks like the following:
query {
  doctor {
    name
    photo
    rating {
      rating
    }
    schedule {
      hospital {
        name
        location
      }
    }
  }
}
Reflectively, the response returned by the GraphQL endpoint would be a JSON like the following sample:
{
  "data" : {
    "doctor": {
      "name": "Felicia Lao, MD",
      "photo": "image/7xy4.png",
      "rating": {
        "rating": 4.5,
      }
      "schedule": [
        {
          "hospital": {
            "name": "San Pedro Hospital of Davao City, Inc.",
            "location": "Guzman St, Poblacion District, Davao City, Davao del Sur"
          }
        }
      ]
    }
  }
}
Let us see how we can make a GraphQL endpoint using NestJS.
Creating a GraphQL endpoint with NestJS.
GraphQL queries are handled using functions known as resolvers at the backend side. Each field in a GraphQL query can be determined using the resolver function associated with it. To see how this works, open a fresh NestJS project or create one with the NestJS CLI command:
nest new
Install the packages needed to work with GraphQL:
npm i @nestjs/graphql graphql-tools graphql apollo-server-express
Create the model that will be exposed as our GraphQL schema. This is done by creating a TypeScript class and annotating using decorators from the @nestjs/graphql package:
import { Field, ObjectType } from '@nestjs/graphql';

@ObjectType()
export class Doctor {
  @Field({ nullable: true })
  name?: string;

  @Field({ nullable: true })
  specialty?: string;
}
Next, we import the GraphQL module to our AppModule. We also get to specify where our schema file will be generated. In app.module.ts, we’d have:
import { GraphQLModule } from '@nestjs/graphql';
…

@Module({
  imports: [
    GraphQLModule.forRoot({
      autoSchemaFile: join(process.cwd(), 'src/schema.gql'),
    })
…
Create a resolver by running the following Nest CLI command:
nest generate resolver doctor –no-spec
This adds a doctor.resolver.ts file into the project and automatically providers it to the app.module.ts. The doctor.resolver.ts will be where we’ll define our single resolver for the project:
import { Resolver, Query } from '@nestjs/graphql';
import { Doctor } from 'src/doctor.model';

@Resolver()
export class DoctorResolver {
    @Query(() => Doctor)
    async doctor(): Promise<Doctor> {
        return {
            "name": "Felicia Lao",
            "specialty": "Internal Medicine"
        };
    }
}
In the code above, we describe that the Doctor model will be a possible entrypoint for our query. We just return a constant Doctor object to keep it simple.
Run the project with:
npm run start:dev
Then navigate to localhost:3000/graphql to open the GraphQL playground. This is where we can run queries such as:
query {
  doctor {
    name,
    specialty
  }
}
which would respond with a JSON we returned from our resolver:
{
  "data": {
    "doctor": {
      "name": "Felicia Lao",
      "specialty": "Internal Medicine"
    }
  }
}
Resources
Learn more about GraphQL in their official documentation or learn how to create GraphQL endpoints with NestJS in the NestJS official documentation.
You can also checkout my Github repository for a more thorough NestJS GraphQL demonstration.